


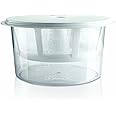
Euro Cuisine GY50 Greek Yogurt Maker with Ultra Fine Mesh Strainer Basket, BPA Free, Patented Greek Yogurt Strainer for Homemade Greek Yogurt (White)

Description
🥄 Elevate Your Yogurt Experience - Because Ordinary is So Last Year!
- EFFORTLESS CLEANING - High-quality mesh strainer ensures perfect consistency and easy cleanup.
- SPACE SAVING DESIGN - Patented design fits perfectly in your fridge, maximizing convenience without clutter.
- TRANSFORM YOUR YOGURT GAME - Easily convert up to 2 quarts of regular yogurt into thick, creamy Greek yogurt.
- ECO FRIENDLY BUDGET SAVVY - Make Greek yogurt at home, avoiding additives while saving money and reducing waste.
- HEALTHY CULINARY DELIGHTS AWAIT - Create nutritious dips, spreads, and desserts with endless recipe inspiration.
The Euro Cuisine GY50 Greek Yogurt Maker allows you to effortlessly transform up to 2 quarts of regular yogurt into thick, creamy Greek yogurt. With BPA-free components and a patented design, it offers a safe, space-efficient, and eco-friendly solution for homemade yogurt lovers. The included recipe book inspires creativity in the kitchen, making it easy to whip up healthy dips, dressings, and desserts.


Have a Question? See What Others Asked
Reviews
M**M
Essential for making good yogurt.
This makes great yogurt with very little effort. I pour milk into my instant pot, heat it to 185 degrees, cool it to 110 degrees, then add a few tablespoons of yogurt as a starter. 8 hours later I pour the milk mixture into this strainer. I let it sit in the refrigerator for 2 - 3 days to thoroughly strain it. The finished product is almost as thick as cream cheese. Once it's done straining, I put it in a bowl and mix in a tablespoon of honey and a dash of vanilla.This strainer is essential for getting consistent, good results. The yogurt is delicious and after a week of eating it daily, it has helped my gut health. No more bloating, constipation, indigestion.The only suggestion I have to improve the product is to make it a little bigger.
S**N
ONE STOP REVIEW - Strainer Review + Yogurt, Yogurt Starter & Whey Tips
Euro Strainer is the perfect finishing tool for homemade yogurt. I only drain mine for 30 minutes - 2 hours even though it indicates 3-12 hours. This gives me about .5 cups (30 minutes) to 1.5 cups of whey which is perfect for whey bread that I talk about later. The Euro Strainer will hold 2 quarts of yogurt. So, after I make my yogurt either in the pressure cooker (more later) or the microwave/stovetop & oven method, I put the bowl or pressure cooker inner pot into the refrigerator to cool and thicken. Wipe the condensation from the lid.I put the cooled yogurt in the Euro Strainer and put back in the fridge for about 2 hours. When finished & with the lid on, I give it one big flip then drop it about 2" from the counter. A majority of the yogurt will then be removed from the strainer onto the lip. If you did a full 2 quarts of milk, you need to work quickly especially if you didn't strain 3+ hours. I move it to individual containers or two quart mason / ball jars for storage. You will want to get a flat knife or spatula and gently remove any remaining yogurt from the strainer. Be very careful, as it's a fine mesh and you don't want to detach. I then flip it over and use my faucet sprayer working from the outside with it tilted down to drain flushed yogurt into the sink. Spray around the mesh completely removing the yogurt. DO NOT LET THE YOGURT SET UP OR IT WILL BE HARD TO REMOVE. I put it somewhere safe to dry. I flavor my yogurt with stevia & vanilla about 1/8 tsp per cup. Two quarts of milk will yield about 7 cups of yogurt. I add berries as we eat it. The Euro Strainer is a perfect "END" to a great batch of homemade yogurt.YOGURT STARTER: If you are making yogurt starter for your next batch which I what I do every 6th batch, fill your ice cube trays with the plain yogurt before straining or flavoring. When yogurt cubes are set, move to a ziplock for freezer storage. I use two cubes that I lay out to thaw when I start my next yogurt batch. Once slightly thawed, use a fork or knife to break into half to thaw a little quicker.YOGURT TIPS - When I first started making yogurt I brought it to 185 on the stove. I quickly moved to the microwave method and found 16 minutes of 2 quarts of milk in a 2 quart pyrex glass measuring cup (pour pitcher) gives me 185 degree. Stir every 3-4 minutes to get rid of cold spots. You then need to cool to below 120 or you will kill your yogurt bacteria. You can either leave it on the counter for a slow cool or put in a sink of ice cold water. Stirring every so often to cool quicker. By now, your yogurt cubes should be melted and be in your pyrex / bowl or inner pot. As soon as your milk hits 120, pour about a cup of milk back into the pyrex dish or bowl if you are doing the oven method or into the inner pot if doing a pressure cooker method. Stir it around good, then add the remaining milk and stir again.To incubate the yogurt, I put in my Instant Pot which has a yogurt mode setting it for 10 hours and normal pressure. Note, that pressure isn't used, but there is a low setting (Jiu Niang) and a high to scald (I find it's easier in the MW). You aren't under pressure, so you can use a glass Instant Pot lid or with the regular IP lid you can vent or close. When its finished, I wipe the condensation off the top and move to the fridge.You can do the oven method too instead of the Instant Pot. I turn my electric oven on the lowest it will go which is 170. I turn the light on. To incubate, move the yogurt in a bowl/pyrex covered with saran wrap to the oven. Turn off the oven. Do not open the door. Leave for 10 hours with the light on to keep it about 100 degrees.For those without a pressure cooker with yogurt mode or electric oven, I've heard of the hot water method with mason jars in a cooler. People wrap their pressure cookers with a towel. I've not used any of these, but google for more info.WHEY - This old gal has a great whey bread recipe on her site. I use half white and half whole wheat, plus the 1.5 cups of whey, salt and yeast. It's a no knead bread. DO NOT THROW THE WHEY away. It's very nutritious and can be used different ways if you google it. I've even drank it. Think of it as a shot of healthiness.I hope this review helps and although I went into additional details, anyone using a Euro Strainer wants to know how you make the yogurt to strain and also what to do with the whey !!! The price of a gallon of milk is so cheap. A half gallon of milk will yield 7 cups of great yogurt. It's worth the time to make healthy yogurt. If you liked this review, please be sure to mark it was helpful. Thanks.
A**.
Great product!
Super happy with this product after the first use! It was the perfect size for my yogurt recipe (using 1/2 gallon milk), drained the whey beautifully & was easy to get the yogurt out of when through (which is what I was most hesitant about). Would highly recommend! I will add pictures next time I use - next week :)
S**A
Brilliant strainer for Greek yogurt
I used to use a Muslim bag to strain my yogurt to make Greek yogurt. It worked but it was slow and messy. This is brilliant I wish I had thought of it. It’s very effluent and easy to clean and I don’t have to hang it from a cabinet handle.its very easy to clean and does a great job.
D**H
Buy it if you want simple easy yogurt as thick as you like!
Love it, love it, love it!! I make the most wonderful yogurt with my sou vide and strain it overnight - perfection! Thick yogurt, extra rich if you add some cream, and fabulous for FroYo❣️❣️❣️Couldn’t be more delighted with my purchase and I’d buy it again in a heartbeat.
B**N
Slightly Less Effective Than Cheesecloth
I've been making greek yogurt for a while, and had been using a cheesecloth setup to strain the yogurt.Since my setup was a bit messy I was looking for an easier-to-use device.After using the Euro Cuisine GY50 five times, here is what I found.The key question to me was how well the mesh would strain the yogurt compared to cheesecloth.See the photo for a comparison of the straining capabilities of the GY50. They whey was properly extracted, but also allowed some yogurt to pass (jar on right-hand side), whereas the cheesecloth filtered out the whey much better (jar on the left-hand side).Deal-breaker? No. While it could work better, I find it works well enough.Pros:- Fully self-contained- Space-saving for refrigerator- Works for 1/2 gallonCons:- Mesh is somewhat flimsy, and care needs to be taken when cleaning. A good soak and rinse goes a long way to prevent from damaging it.Now stop reading reviews, buy this thing, and go make some greek yogurt.
A**R
AMAZING
This thing is just a god damn piece of plastic and yet it’s absolutely a blast to use and super easy to clean and use for making all kinds of yogurt
R**E
Love making Greek yogurt with this!
So handy to make your own Greek yogurt! It will eventually pay for itself. I’ve made 4 batches of yogurt so far and it’s so much easier than messing with cheese cloth. Definitely worth the purchase!
Common Questions
Trustpilot
5 days ago
2 months ago
