🚀 Elevate Your Projects with Precision Sensors!
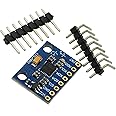
The Gy-521 MPU-6050 Module combines a 3-axis gyroscope and a 3-axis accelerometer in a compact design, offering high measurement accuracy and versatile range options. With a power supply of 3-5V and a robust IIC communication protocol, this module is perfect for personal projects and professional applications alike.
| Brand | REES52 |
| Item dimensions L x W x H | 1 x 1 x 1 inches |
| Material | Plastic, Metal |
| Style | Modern |
| Maximum Supply Voltage | 5 Volts (DC) |
| Measurement Accuracy | High |
| Measuring Range | Gyroscope: ± 250, 500, 1000, 2000 °/s; Accelerometer: ± 2, ± 4, ± 8, ± 16g |
| Mounting Type | Flange Mount |
| Output Type | Digital |
| Specific Uses For Product | personal |
| Upper Temperature Rating | 85 Degrees Celsius |
| UPC | 692011914492 |
| Global Trade Identification Number | 00692011914492 |
| Manufacturer | BlastCase |
| Item model number | REES-01 |
| Item Weight | 0.352 ounces |
| Product Dimensions | 1 x 1 x 1 inches |
| Item Dimensions LxWxH | 1 x 1 x 1 inches |
| Voltage | 5 Volts |
| ASIN | B008BOPN40 |
| Is Discontinued By Manufacturer | Yes |
| Date First Available | June 15, 2012 |
J**K
Very good sensor
After working with this thing for a day or two, I got it to work. I wrote these instructions for the complete beginner to follow. The pinout goes Arduino 5v to Vcc, ground to ground, A4 to SDA, A5 to SCL, XDA and XCL are not connected, AD0 to ground, and finally digital pin 2 to INT. Note, SCL and SDA pins may be moved around between Arduino boards.Next, go grab the I2Cdevlib. Just do a google search to find the main website, then the download is on github. Head to the highest level directory and there will be a download zip button on the right. Download, extract the file. The file should have the path i2cdevlib->Arduino-> LOTS of sensor boards. Copy I2Cdev and MPU6050 into your Arduino library folder (Arduino->library) (You can copy all of the sensors to the library if you wish). Restart Arduino IDE if it is running and try out the MPU6050_raw sketch.Overall, $5 isn't that bad for a 3 axis gyro and accelerometer. It is a bit of a pain to find documentation for but there is a page for the GY521 / MPU6050 on the Arduino website.Hope this helps.Edit! I started playing around with this chip again and was able to get it work 100%. It turns out, there is plenty of documentation for this chip, you just need to know where to look (Nearly every hobby level multicopter uses this same sensor). It really is just a standard 3v I2C device.Within the MPU6050_DMP6 sketch, at about line 90-120ish, there are a few #define's. Turns out you can select what type of output gets spat to the serial port. If you want to use the teapot demo, you need to comment out #define OUTPUT_READABLE_YAWPITCHROLL then uncomment #define OUTPUT_TEAPOT to make it work.
P**E
Amazing how accurate this thing is for the money (A Few Tips Within Review - Also Important note)
It's amazing how accurate this thing is for the money. After writing the code necessary to read in the gyro and accelerometer values the angles it measured were extremly accurate. It accurate enough to use for a quadcopter. I used a complimentary filter to find the angle values. The complimentary filter is simple and is as follows. angle = Filter_gain*angle_gyro+(1-Filter_gain)*angle_accel. I used a filter gain of .98 becuase the acceleromoter values can be very noisey.Tips:-Write some code to find the zeros for the accelorometer gyro in the beginning of the code before the main loop. Then use the calibrated values in your main loop.-Buy a soldering iron to attach this to the pin headers-figure out the angle measurment from the accelerometer and gyro by finding the sensitity for the setting you have.-For basic angle calc like I did on the arduino uno you only need to attach vcc to 5 or 3 volts, GND to ground, SCL to A5 pin, SDA to A4 pinAnother note Important note that drove me crazy:When I read in the gyros over i2c I found that the gyro y addresses were actually the -gyro x value and the gyro x addresses were the gyro y value. Not sure if that's specific to the one I received or if all are like this. (maybe the MPU chip itself was mounted wrong). Once I figured this out it was an easy fix so this still gets 5 stars.
A**W
Good unit for the right price.
I am fairly new to Arduino projects, so this was a perfect breakout board to get my feet wet. The major down side to this product is that its difficult to find info on it (as said by other users). After finding some code, the unit seems to work pretty well... I used this board on a quadcopter to help with the inherent stability issues.Hopefully I'll save some people the time to dig up this information. Here is a link for those doing arduino projects:[...] --> See first comment on this posthere's the source code for the I2C library I used:[...] --> See first comment on this postThis library contains two helpful examples; one that allows the raw accelerometer and gyroscope values to be accessed, and the other calculates Euler angles, yaw pitch roll, world accelerations, and quaternions. If you using this with an arduino, make sure that the I2C library and a MPU6050 library are in the Arduino sketch folder, this will allow it to compile correctly.This was also difficult to find:The GY-521 breakout board is wired to the Arduino Mega as followed:Vcc - 3.3VGND - GNDSCL - SCL (pin 21)SDA - SDA (pin 20)ADO - GNDINT - D2The GY-521 breakout board is wired to the Arduino Uno as followed:Vcc - 3.3VGND - GNDSCL - D5SDA - D4ADO - GNDINT - D2
M**.
Needs 5V
Needs 5V
K**N
Ships fast and no issues!
Ships fast and no issues!
E**E
Fantastic chip, inexpensive but powerful
Chip worked very well with my Arduino. I've used analog accel/gyro sensors before (Razor 6dof), so this was my first encounter with digital. Getting it up and running took a little bit of digging, but there is plenty of information out there to guide you. The best tips I can offer you is to first find code to calibrate this thing. They HAVE to be calibrated to work properly. Jeff Rowberg is a name that will come up, he's written a lot of code for it, but the actual calibration script I found was by Luis Ródenas. You'll need to include the library file, MPU6050.h, but that should be all together. This calibration script will produce 6 calibration offset values... 3 for each of axis for both chips (3*2=6). From that point on you'll need to write those offset values to the chip at the beginning of your code using the function similar to, "accelgyro.setXGyroOffset(30)".So bottom line is, this is an excellent board, it seems very accurate (within tenths of a degree), and works quite well once it's calibrated. Best of luck!
N**A
it does the job
project useful
Trustpilot
1 month ago
1 day ago